A Closer Look at Our Quality
Architectural services, design quality, and documentation can differ greatly from one consultant to another. This often leaves clients uncertain — feeling as though they must proceed blindly and simply hope for the best.
Unlike building work, where the Guide to Standards & Tolerances gives you something concrete to measure...
Architectural drawings have no equivalent benchmark. The difference between one architect’s documentation and another can be enormous — and most clients only discover that gap once they’re already deep into the project… or deep into trouble.
That’s why we put together this page — to give you a clear, concrete picture of our quality.
The aim isn’t to overwhelm, but to highlight the elements that genuinely add value and protect you — that improve home-building or development outcomes, prevent avoidable delays, reduce on-site disputes, and keep your project clear, profitable, and progressing smoothly.
Ultimately, these help you reach a completed renovation or development — faster and with far less friction. You have concrete documents that track our deliverables, giving you confidence in what you can expect when we work together.
1. The Design
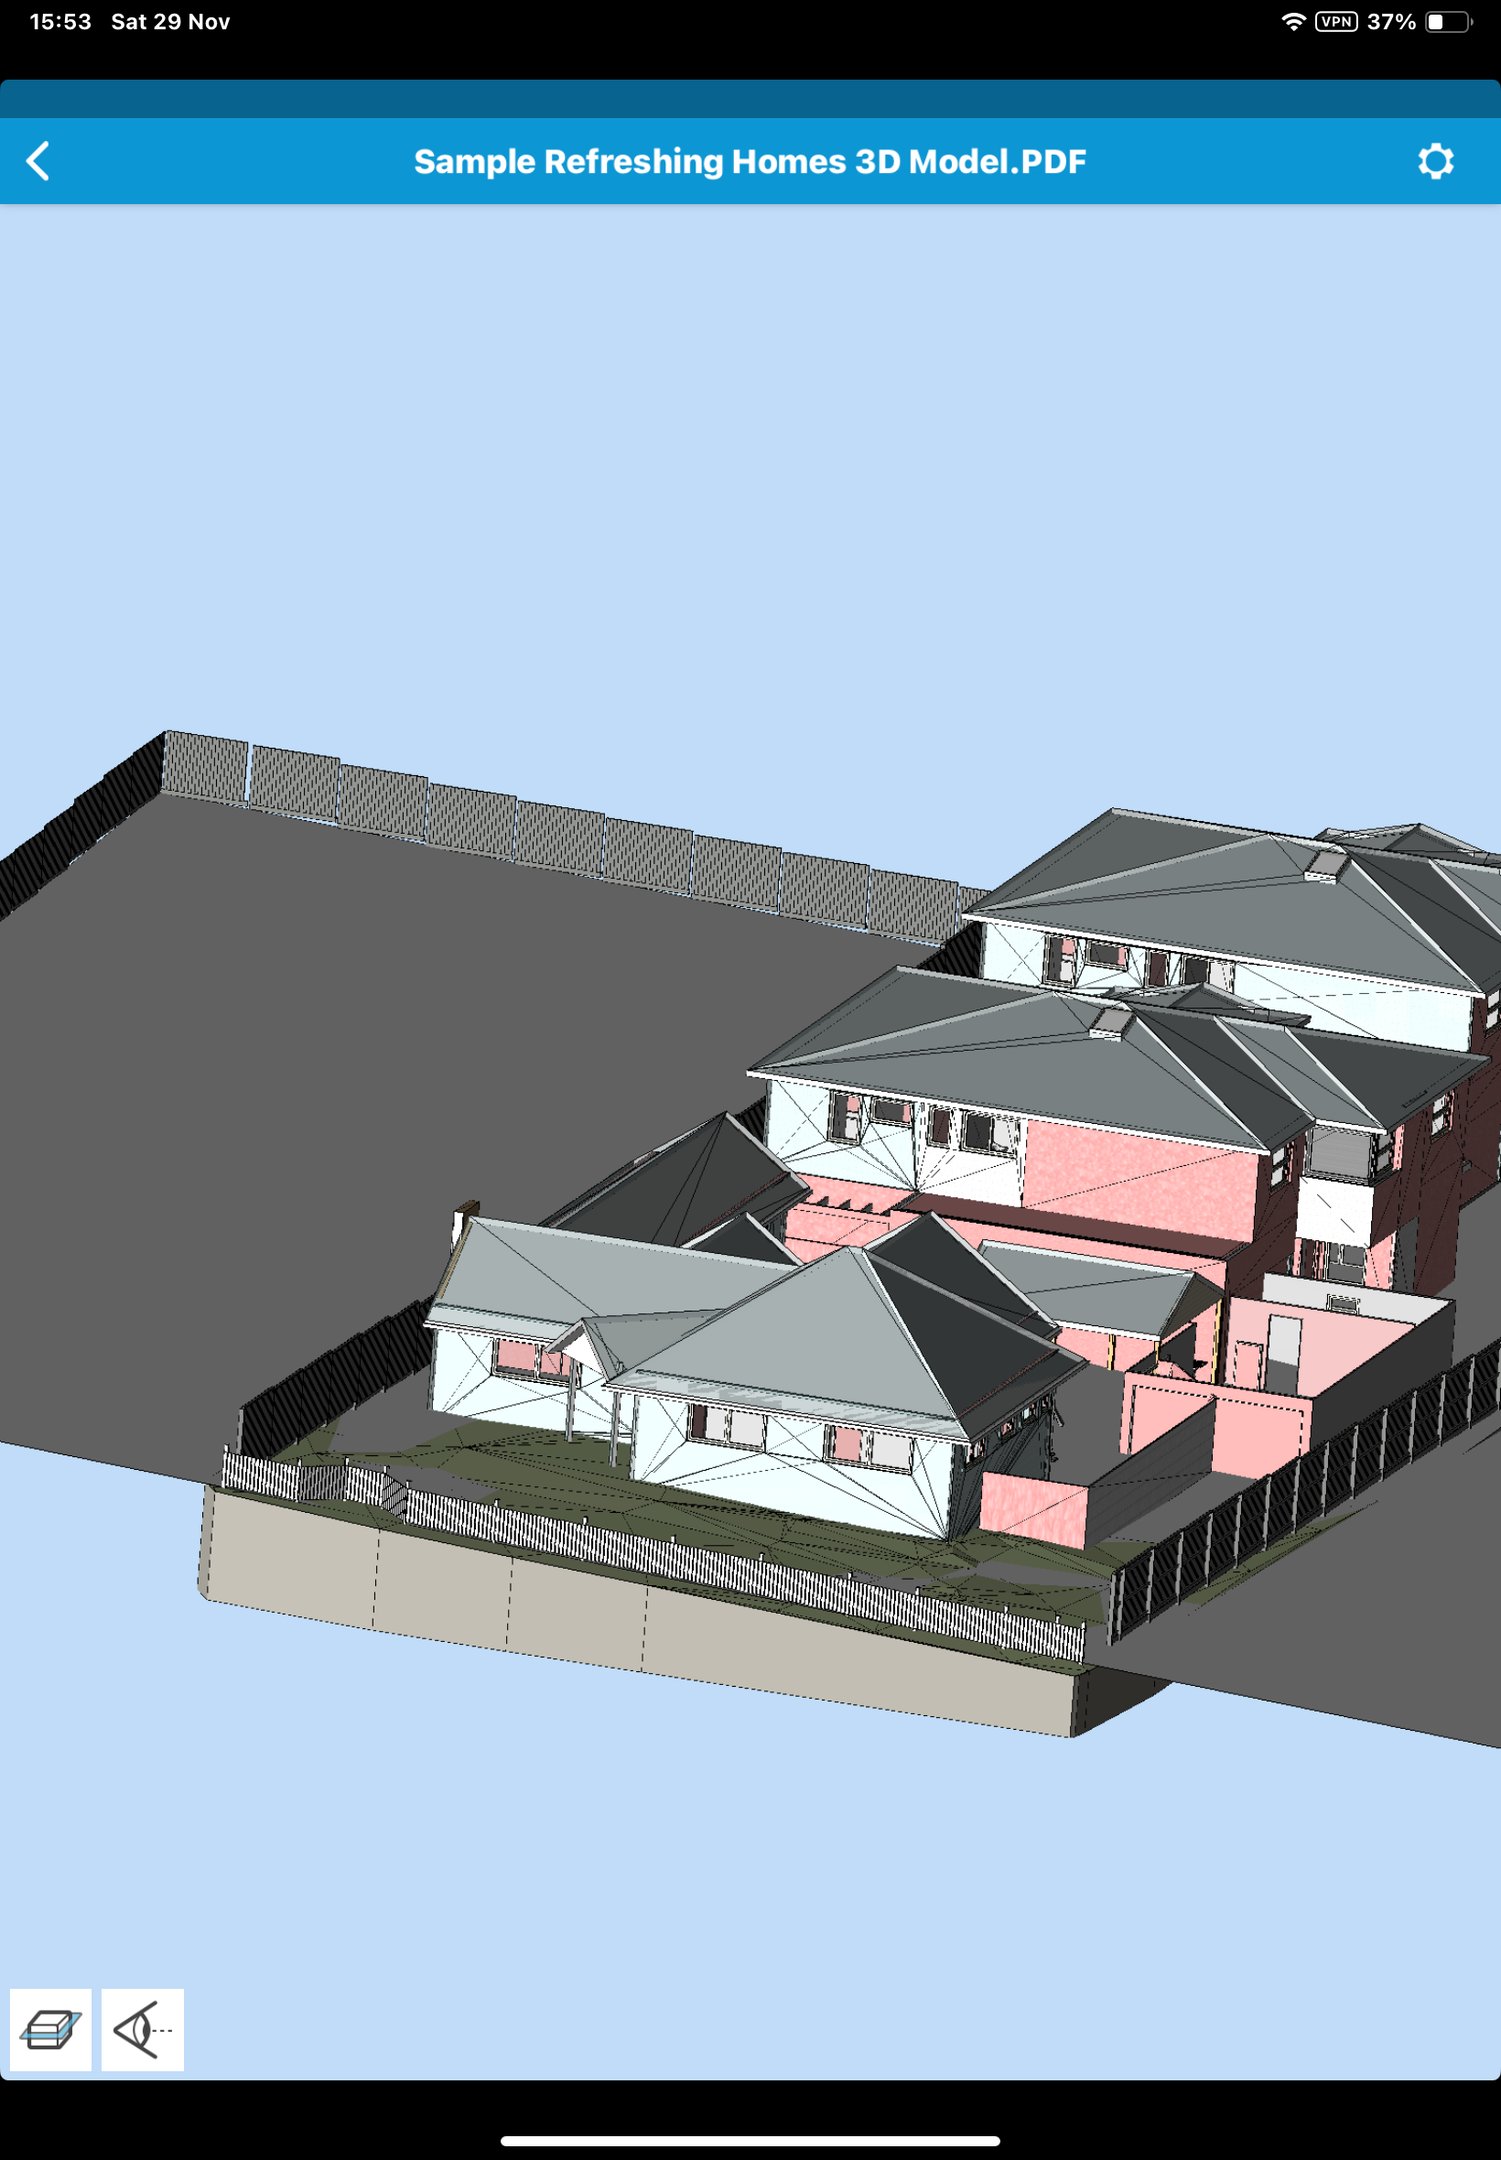
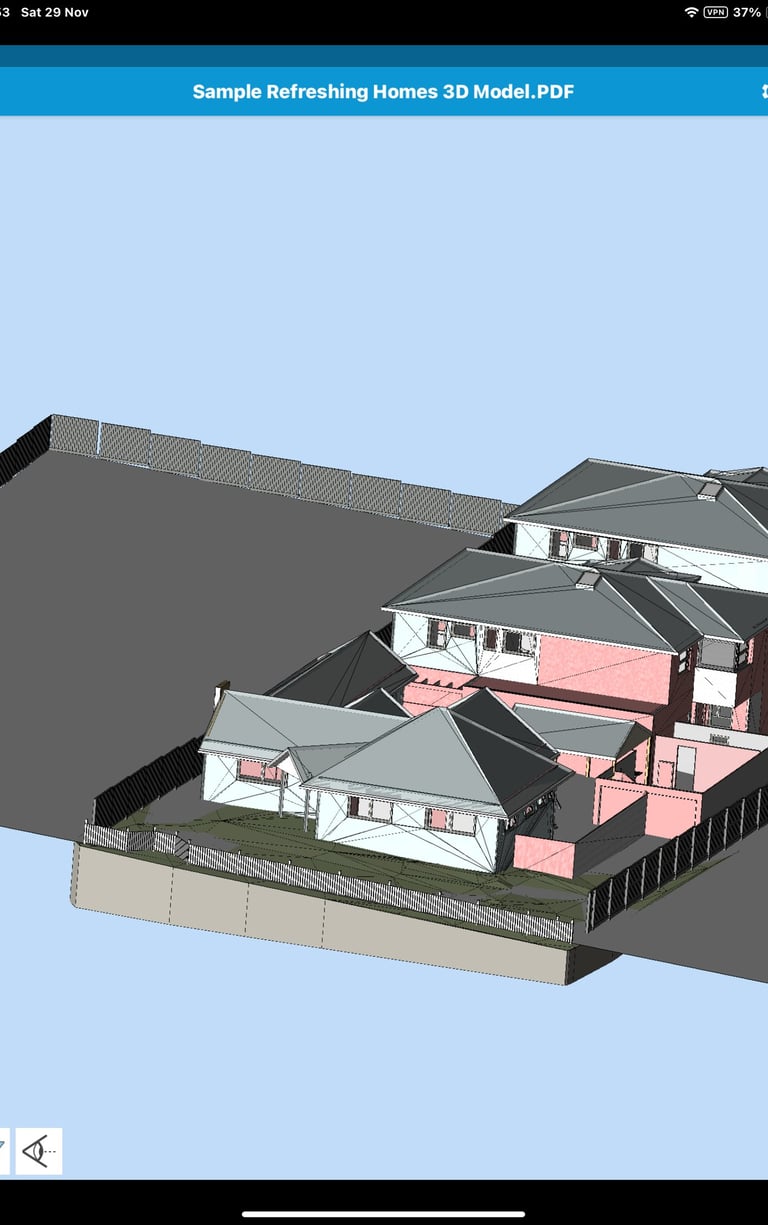
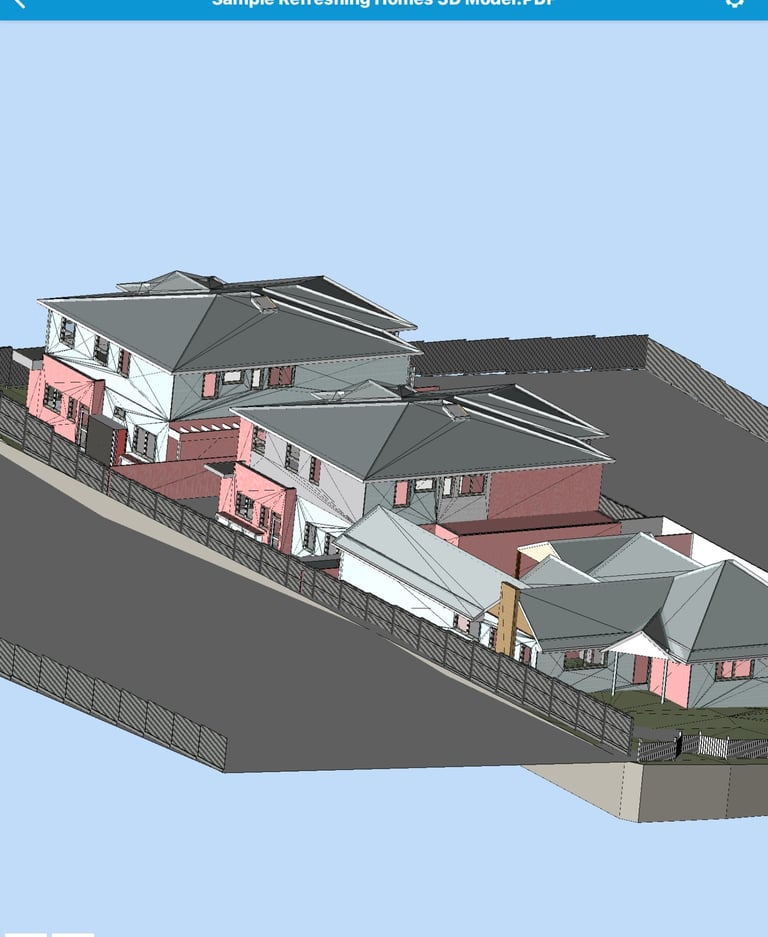
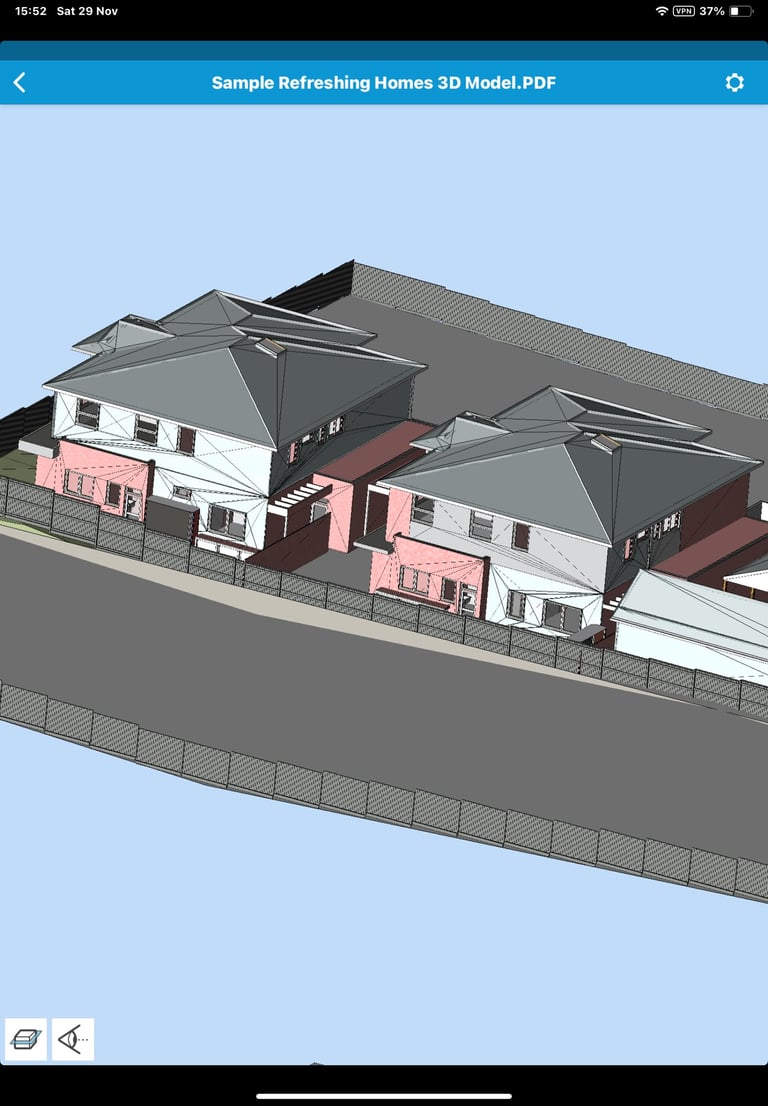
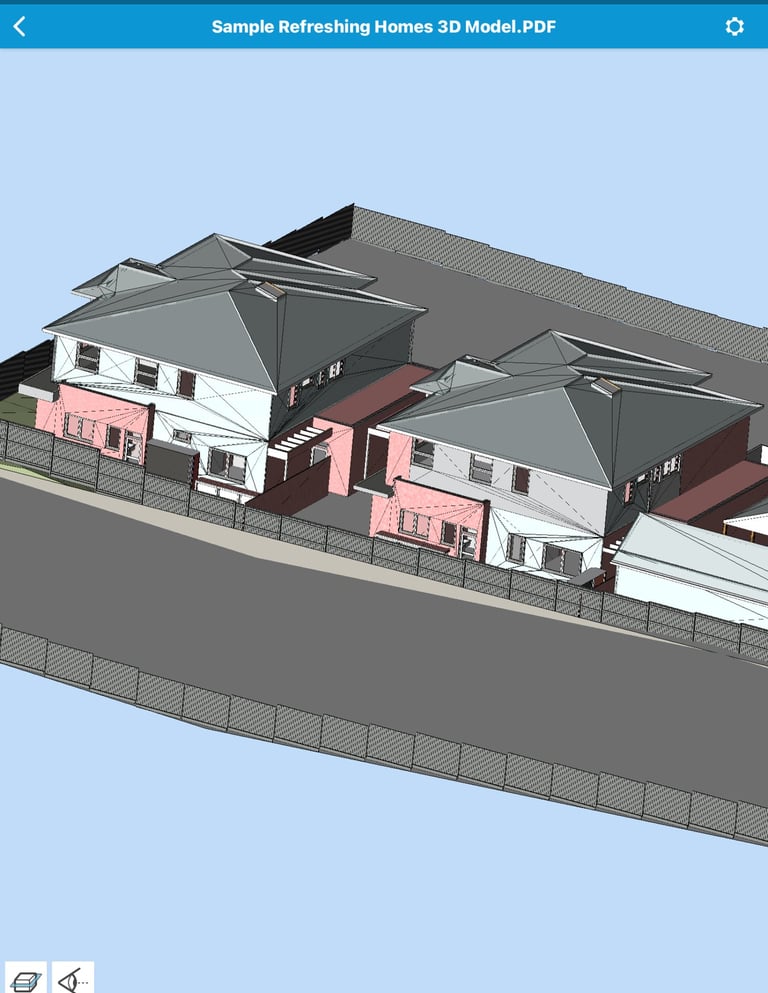
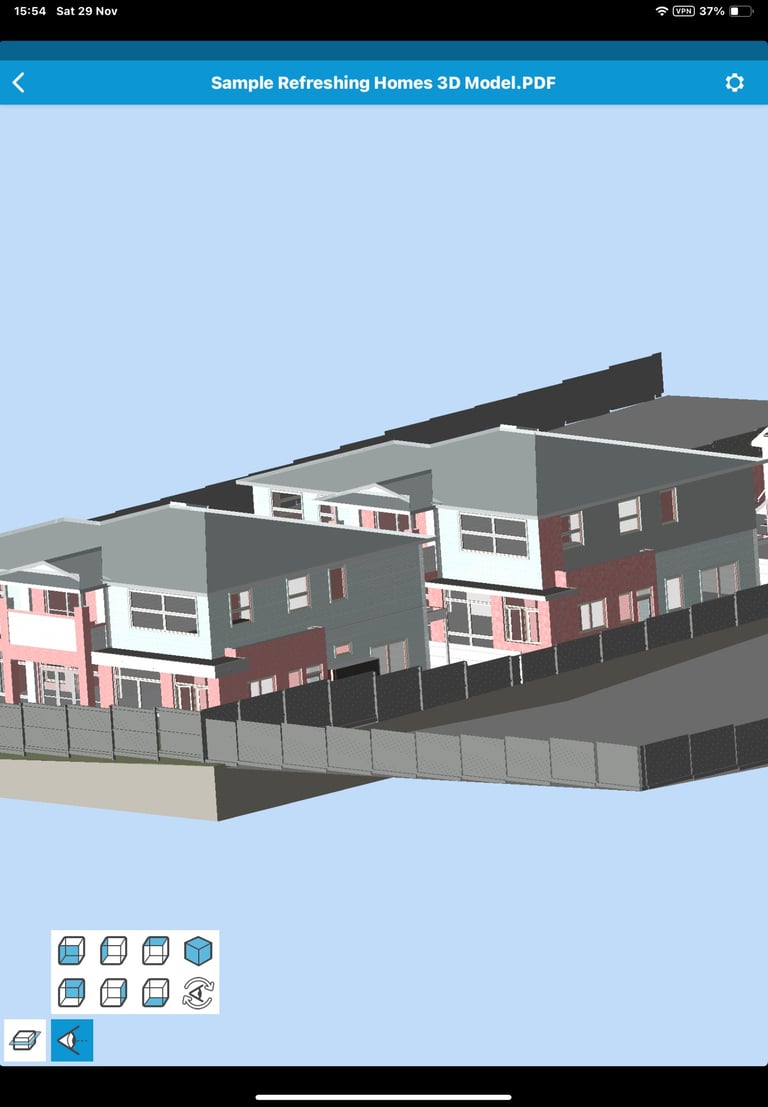
Sample Design package
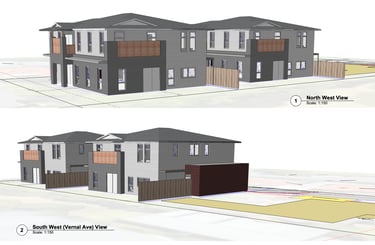
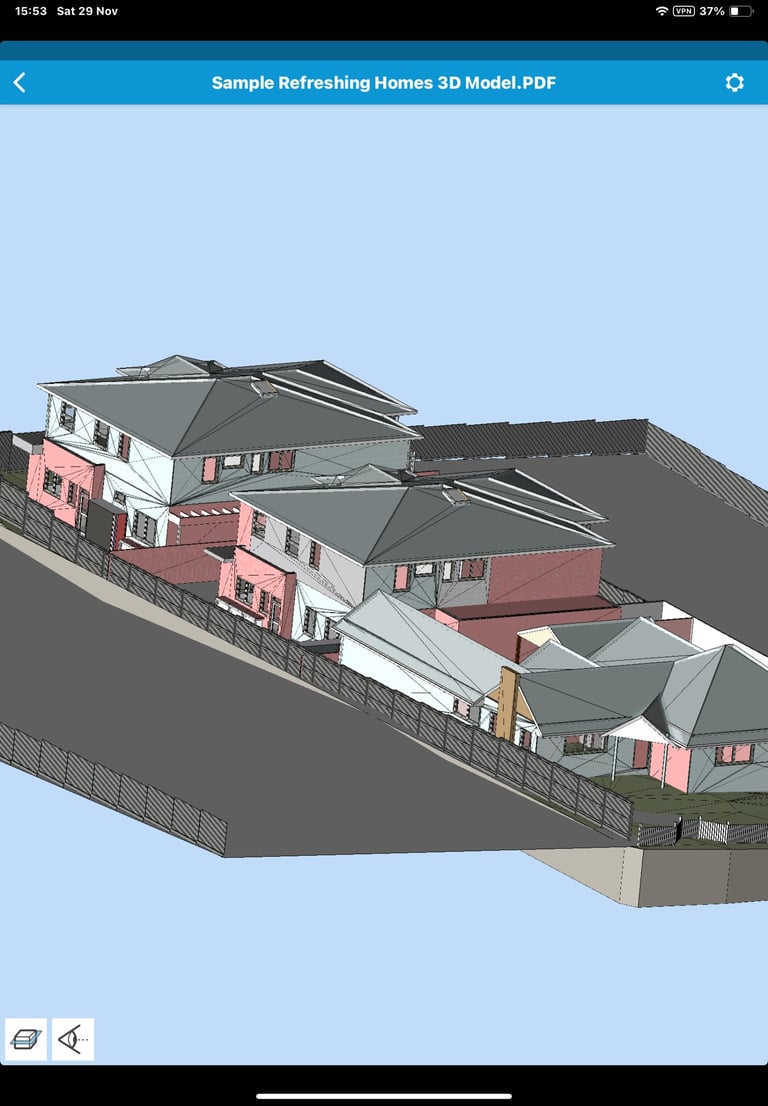
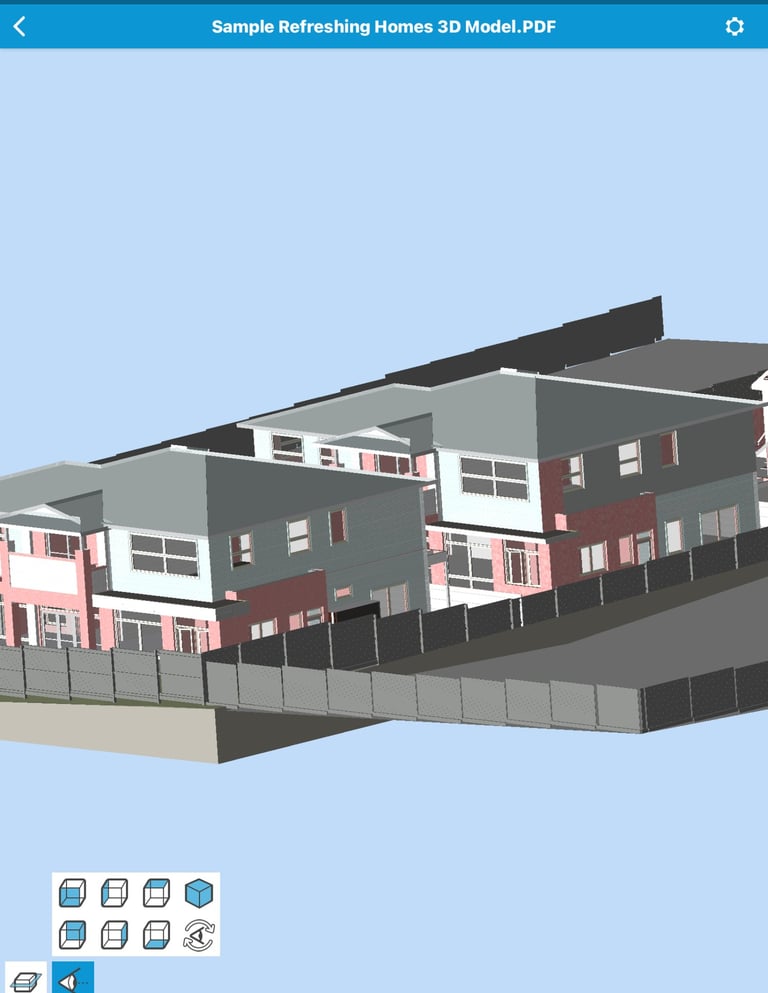
Sample 3D Model
Recommended software for viewing:
IPad - 3D PDF Reader
PC/Mac - Adobe Acrobat Reader
With a home or development costing anywhere from $500,000 to over $2 million, the first challenge is absolute certainty you’re building what you — and everyone important to you — truly want.
You may need to balance the views of your partner and family; sometimes real estate agents, business partners, or well-intentioned relatives... Quickly! Because for example, a $1.2 million loan on a standard mortgage can cost around $5,000 per month in interest alone.
This is exactly where architectural quality is valuable.
Our job is not just to “draw a plan.” It’s to give your team clarity early — preparing models and documents that you can share with everyone who matters — so you and your loved ones or business partners can make coherent, confident decisions without guesswork or delays.
That’s why at this stage, you will receive:
Floor plans with written notes explaining why key design decisions were made — how your brief has been addressed, what constraints were considered, and what solutions were chosen to balance rules, buildability, cost, sunlight, privacy, and yield.
3D views and a 3D model, so you can experience the design as it will truly feel — not just imagine it from a flat line drawing.
These documents you can share with your family or stakeholders. Avoid confusion, allowing them to give logical, meaningful comments — helping you compile coherent feedback and progress quickly.
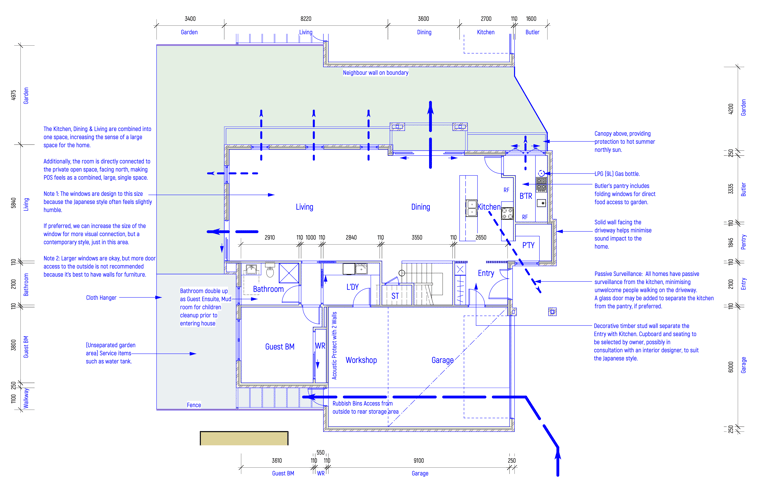
These documents aren’t basic 2D plans that ask you to, for example, “mark up where you want the bedroom” if you’re not comfortable with the layout.
Our work gets you to ask: “Does this design solve the problems and meet my brief?”
And if not, what item in the brief hasn’t been solved?
Then we get to work - rebalancing the requirements and update the design for you.


Sometimes, of course, there can be impossible design briefs — such as expecting every room to face north on a south-facing block.
But with proper design, clear drawings, and explanations of the different factors, the conversation about balancing competing priorities becomes honest, early, and productive.
This level of detail avoids the need to make design adjustments during construction, which can easily cost tens of thousands of dollars and result in delays of several months.
Your 3D model and annotated plans with design explanations are the most affordable way to ensure you are building exactly what you want.
These documents give you, your family, or your development partners something real to point at, discuss, and confidently decide on.
Once everyone can clearly see the design, most projects reach a final decision within one or two reviews — not ten.
It saves months.
It improves communication.
It prevents costly changes during construction.
And it gives you a design you genuinely love before you spend hundreds of thousands building it.


2. The Planning Permit
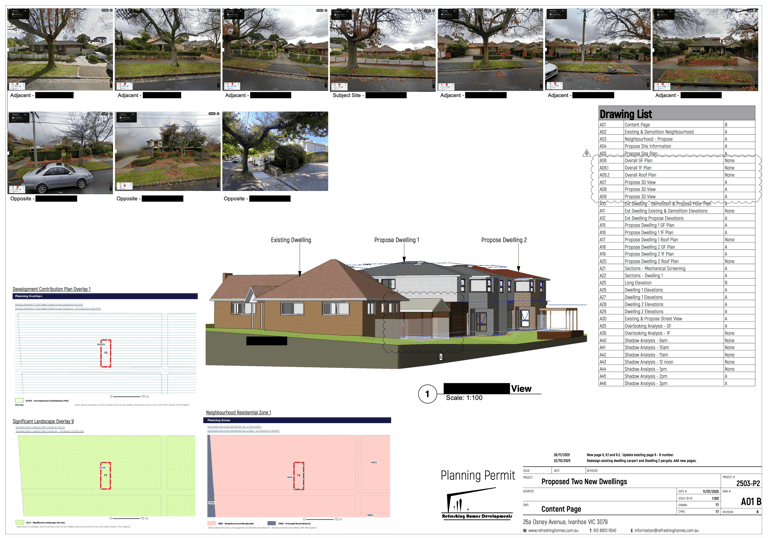
Sample Planning Permit Drawing
Sample Planning Report
How Council works?
Council wants to approve your application — they just need two things:
Your design must meet the rules, or
If the design varies from the rules, it must demonstrate that it meets the neighbourhood character and provides good amenity outcomes based on the site constraints.
If you can demonstrate one of these, your Planning Permit will be approved.
But here’s the key point: justifying the design is the owner’s responsibility — not Council’s.
This is exactly why the quality of your planning documentation matters so much. A clear, well-structured set of drawings — with evidence, reasoning, and compliance demonstrated up front — dramatically reduces questions, objections, delays, and costly redesign work, and greatly improves your chances of a fast approval.
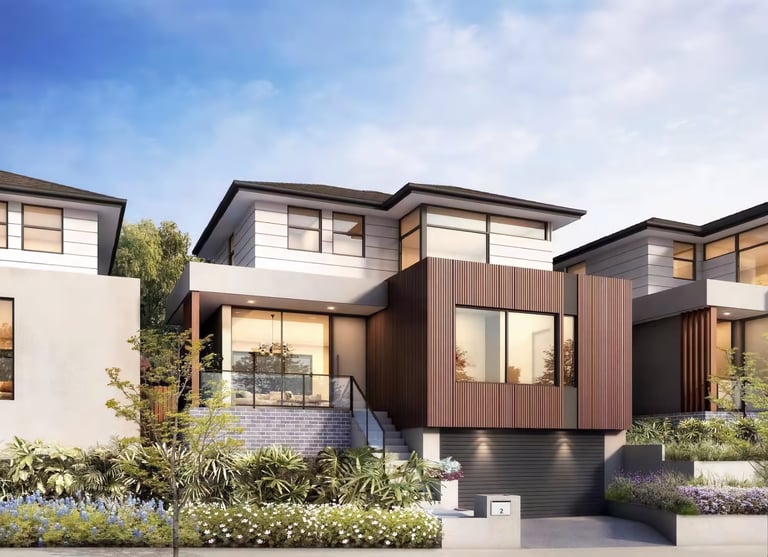
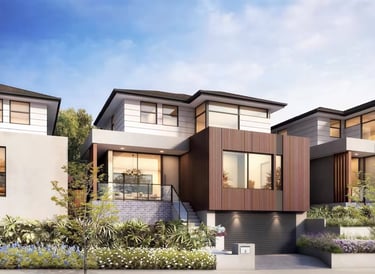
The neighbourhood photos and the 3D overview help readers understand the proposal in context — what the street looks like, how the existing home sits, and how everything fits together as a whole.
When you present the argument supporting the design, the goal is to emphasise the aspects of the neighbourhood that support your proposal. This isn’t about giving every house equal attention to appear “fair.” It’s about demonstrating whether anyone nearby has already done something similar.
In town planning, that’s demonstrating precedent.
Under the common law — you are allowed to do whatever you want, as long as it is legal.
So in town planning, if someone around you has already built “that” legally before, then “that” should also be legal — provided you can justify that the circumstances are equivalent for your proposal around your site and the rules haven’t changed.

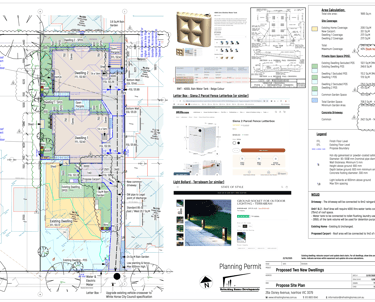
The information on our document is typically far more comprehensive than drafting packages — it shows plumbing and stormwater logic, crossovers, retaining walls, site levels, and how everything ties into the existing conditions. Some may wonder: Is this level of detail essential?
In most cases, yes, because it demonstrates that the site has been thoroughly understood. Sometimes Council, authority reviewers, or neighbours may only need half the information shown. But when the one piece of information they need is missing, the file sits on a desk, waiting…
…and you pay for it through lost time and extra bank interest.
During advertising, when neighbours receive the drawings, certainty matters even more. Good neighbours don’t object out of malice — they object when they’re unsure. Clear information reduces that uncertainty. It doesn’t eliminate objections entirely (there will always be one or two people who worry about everything), but it reduces the overall number of objections, which can save you processing time.

We prepare extensive 3D perspectives to help neighbours understand what’s happening without needing any architectural background. Most people struggle to interpret a flat 2D plan, but almost everyone can understand a 3D image instantly.
This clarity prevents neighbours from thinking they’re being impacted when they’re actually not — because the last thing you want is a simple misunderstanding turning into a written objection.
You might ask: “But didn’t the Victorian Planning Scheme recently strengthen the role of Deem-to-Satisfy (DTS)?”
Yes. In December 2023, the State updated the Planning Scheme to explicitly state that if a design meets a DTS clause, neither Council nor neighbours can object to that clause.
However, in practice, Council systems don’t change overnight.
Most Councils have long-standing internal policies that require applications with a certain number of objections — often 4 or 5 — to be escalated to manager or CEO. In some cases, if the number climbs higher, the application must go to a full Council meeting.
Has Council updated its internal policy so complaints about DTS clauses no longer count toward objection number? We don’t know.
But if you can avoid triggering that escalation, you absolutely should — because your holding costs don’t pause.


Some consultants may suggest minimising the details in the planning permit drawings to avoid amendments later. But in reality, certainty and clear information prevent unnecessary questions from Council, reduce the risk of neighbours assuming they may be impacted, and avoid long cycles of clarification — saving you weeks, if not months, of waiting time.
When you show real materials, real window types, real screening, and accurate heights, things move faster.
Some may ask: “What if the Building Permit stage adjusts something — like a window width? Won’t that cause trouble?”
Here’s the proper sequence:
Get the Planning Permit approved.
Engage your Building Permit consultants.
Update the design based on structural, safety, and compliance requirements.
Submit the refined design to Council for Planning Permit Endorsed Plans.
If Step 4 triggers secondary consent, the Council officer might simply say, “That’s fine — these are minor changes,” and approve them under delegation without sending the plans back out to neighbours for months of advertising.
You might then wonder, “But isn’t secondary consent still a hassle?”
Indeed, it’s a small hassle. But think of it this way: bank interest can cost tens of thousands per month, and the initial town-planning permit process can be delayed 3–6 months simply due to missing or unclear information — easily adding $15,000 to $30,000 in interest alone.
In comparison, a secondary consent to amend something — if you even need one — might cost around two thousand dollars in council and consultant fees. And the month it takes to process can run in parallel with preparing your building-permit documents and getting ready for site works.
So from a practical and financial point of view, it’s far better to show as much detail as possible upfront. It helps Council understand the design quickly, reduces back-and-forth, and speeds up your approval.


Many designers take the quick fix and simply frost every upper-floor window to 1.7 m from floor to solve the overlooking problem — but that reduces amenity and knocks value off your property.
The Planning Scheme often allows you to keep a much larger portion of your first-floor windows transparent. And while neighbours instinctively dislike transparent windows, the amenity of your home — or the value of your development — is far better when those windows allow proper views.
Imagine a first-floor rumpus room with 1.7 m of frosting all the way around. You can only see the sky; everything below is a sheet of white light. The space feels more like a hospital ward than a home. But if you design the screening correctly, and can justify reducing the frosting to, say, 1.5 m from floor, suddenly any adult can see the trees in the distance and enjoy a real outlook.
That small difference determines whether a space becomes a room you want to spend time in — or a room you avoid. And in a development, it can be the difference between attracting that one committed buyer or watching them walk straight to the project next door.
That’s why you will see multiple section diagrams in our drawings: to test, justify, fine-tune, and design compliant screening solutions that resolve overlooking while creating the most comfortable and enjoyable spaces possible. This ensures your new home or development feels welcoming, livable, and genuinely pleasant to spend time in.


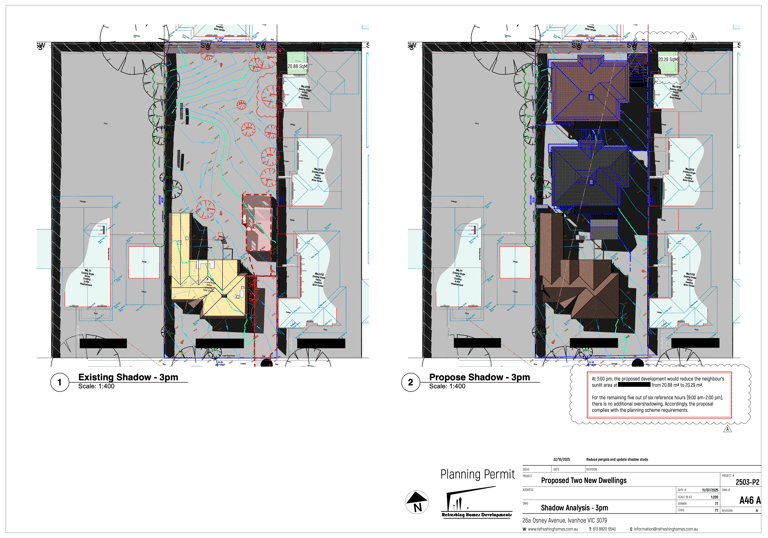
Shadow diagrams require dozens of tests and iterations, especially when working near neighbours with small backyards.
Every adjustment to the design is made because of how the shadows might impact those neighbours. Each iteration involves refining something — trimming an eave, adjusting a room, altering a roof pitch — then regenerating the shadows, reviewing the outcome, and refining again.
All of this has to work within the planning rules to achieve the best possible result.
The complexity isn’t always visible. A good example is Dwelling 2’s living room in this project. Initially, the ground-floor living room could only have an east-facing fixed window, frosted to 1.7 m and unable to open onto the deck. If you added screening at the fence to avoid overlooking, it would cast a shadow onto the neighbour; if you didn’t, you’d have overlooking. A classic Catch-22.
After multiple refinements, we adjusted the design and demonstrated — using section diagrams — that there would be no overlooking at the door. This allowed us to use a transparent door. By then lowering the deck, we were able to rely on a Deem-to-Satisfy rule that still permitted a higher deck on the boundary — without adding screening and without casting extra shadow.
The result is a living room that opens seamlessly to an outdoor deck — a space that’s genuinely enjoyable to live in, and if you’re a developer, a feature that significantly increases appeal and market value.

Ask a Question
Email:
Telephone:
information@refreshinghomes.com.au
+61 (3) 8820 6540
+61 403 589 873
Town planning reports are a summary of policy references — and they demonstrate one critical quality: Compliance.
For larger projects, or any application where you’re pushing the boundaries, an experienced Town Planner should lead. The Town Planner coordinates traffic, waste, sustainability, landscape, and the architect’s design. They cross-check everything before the report is written, and the final report becomes the “glue” that holds the entire submission together.
A good Town Planner has deep knowledge of VCAT decisions and past precedents, which gives them far more tools to justify variations to the rules.
And remember: your justification is meant to show that ONE others has already built “that” legally — and therefore you should be allowed to do it too. (Refer above)
For smaller projects, or developments seeking only minor variations, a good Architect is your most efficient lead. They can prepare the planning report that “glues” the entire submission together — exactly as shown in our sample report.
When the design logic is clearly explained, the compliance is demonstrated, and the minor variations are justified using sound architectural reasoning, Council can comfortably approve the proposal because Council’s intention is always to support the community and approve what is legal and reasonable for the site.

When a design needs a variation to the rule, the documentation should clearly spell out what is varying, why it’s varying, and the effect on neighbours or the streetscape.
It should show how the design aligns with neighbourhood character, architectural reasoning, and the intent of the planning rules — backed by evidence such as diagrams, context photos, and examples of what already exists in the area, just like in our sample report.
A variation is not asking Council to “let something slide.” You are showing Council that the proposal still meets the intent of the Planning Scheme. You are giving Council technical grounds they can confidently rely on when writing their internal report.
That level of clarity makes it far easier — and far more comfortable — for Council to support you. It shows Council you’re not cutting corners; you’re designing intelligently within real-world constraints.

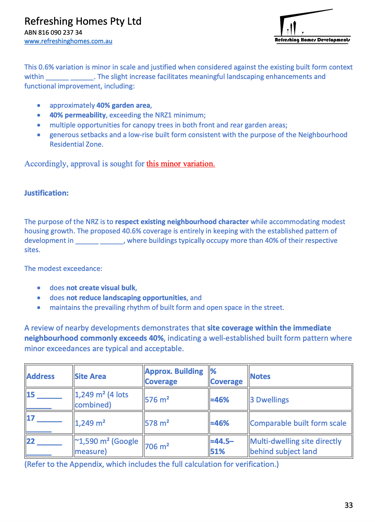
And further to the point about evidence, this is exactly why the Appendix section in the sample report compares the proposal with the neighbouring properties, and shows how the key information has been captured.
The clarity this provides is powerful:
It shows you understand the neighbourhood character using real, verifiable data.
It helps the Council officer trust the content of your report — they can skim it confidently rather than spending days checking every line in detail.
And because you’ve already provided a sensible justification, the officer saves time by not having to create that justification themselves in their internal delegate report.
All of this can add up to weeks — sometimes months — of permit processing time saved. And when you consider that a $1.2 million mortgage costs about $5,000 per month in bank interest, those weeks saved can quickly translate into your next family trip to Europe — or real development profit.

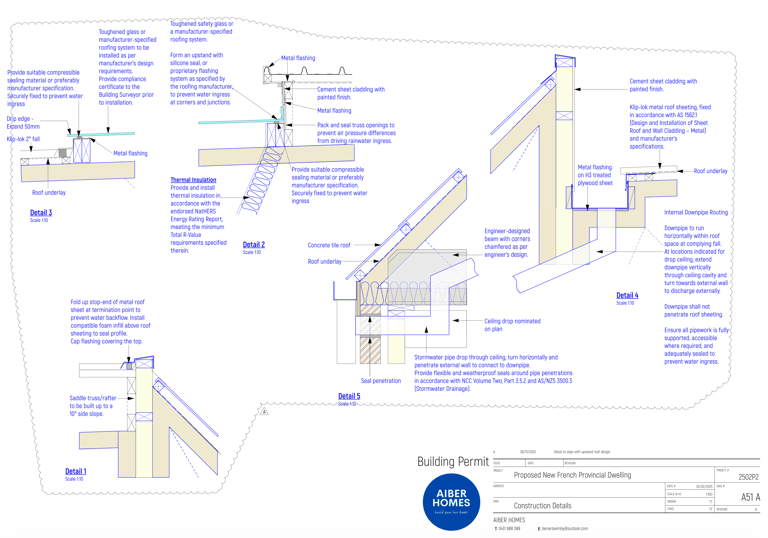
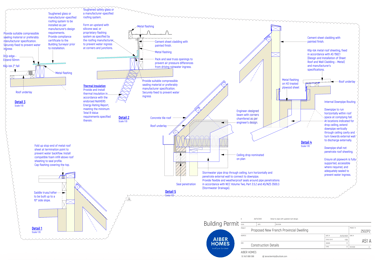
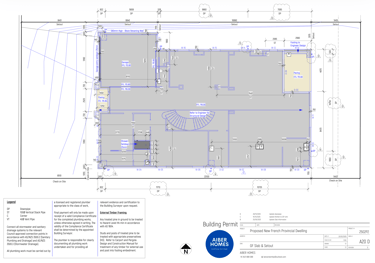
3. The building Permit
Sample Building Permit Drawing
A Building Permit essentially answers one question:
“If you build exactly what’s shown on these drawings, will the home be safe?”
Safe in two ways...
Physically safe:
The structure is sound, the house won’t leak, and it’s designed to last at least 50 years.
Habitable & Comfortable:
The home feels comfortable and liveable — warm enough, protected enough, with the right amount of light and ventilation so people actually enjoy living in it.
Building-permit documentation isn’t rocket science. Most draftspersons can eventually put together a set that gets approved — often after a few rounds of corrections with the Building Surveyor.
But here’s our differences:
We don’t like the ultra-basic line drawings many draftspersons produce.
And we also don’t include additional pages that increase architectural fees but don’t actually help domestic builders or homeowners.
Domestic projects behave very differently from commercial ones. In residential builds, the level of detail you should put in the drawings comes down to whether you genuinely demonstrate contractual authority — or not?
What does that mean?
In the last eight years, I’ve had one client (his business is opening restaurants that achieve Michelin-star ratings) who insisted the building contract be signed in their lawyer’s office. You can imagine the tone that sets...
Nobody is swapping tiles, skipping details, or quietly downgrading selections on that project. So the architectural specification is as detailed as it can be. Every product is specified — the brand, the colour, right down to the transition strip between the timber and the tile floor.
But most homeowners understandably know they have legal protections under the law — yet enforcing those protections takes an enormous amount of time, energy, and money. For everyday families or small developers, that simply isn’t realistic.
So the real solution?
Work with the builder as a person — and get their buy-in early.
This is also why you may occasionally feel our drawings are “missing” something. If you ever notice something you think is important, just call me and we’ll discuss it. In many cases, those omissions are intentional — designed to spark early conversations, encourage collaboration, and help set build prices in a way that’s favourable to you as the owner.
Where We Add More Detail
You’ll also notice that we include more detail than many others — especially around waterproofing or any mistake that occurs can cost the builder a lot to rectify.
All those details are added because they save you time, avoid arguments, reduce variation claims, and prevent issues down the track.
In Short
Yes — every building permit set “complies.”
But not all building-permit drawings make construction stage easier.
The sets that save you and the builder time usually create a far better built outcome, because your team spends their effort solving real problems, not avoidable ones.
When your design is a little more interesting than a simple rectangular box, a 3D image streamline communication — helping Building Surveyor, builder and every trade on site clearly understand what you're actually building.
Yes, people in the construction industry can read plans. But not everyone reads them well, and not everyone interprets them the same way. It’s like reading the news — if you’re a stock investor and you see a photo of the new MacBook at the top of the article, you instantly understand the context. In contrast, if the article opens with, “This new product from Apple has 10 performance cores…”, you need a moment to orient yourself.
Builders, roof plumbers, concretors, carpenters… they all have staff, subcontractors, apprentices. 3D image helps everyone get on the same page instantly.
That’s why we include the 3D views. They don’t replace the technical drawings — they simply minimise confusion and improve efficiency on site.
Good design avoids frosting every window to 1.7 m from the floor “just to be safe.” Those high frosted windows can turn a lovely room into something that feels more like a science lab or a hospital ward.
We checking levels, boundary heights, thresholds, sightlines, fences, screening, and all the relevant rules under the Building Regulations properly. If a transparent window is allowed — you get it. If it only needs frosting to 1.5 m — we frost it to 1.5 m, not the full 1.7 m. And if fine-tuning a room allows a better view, we make that adjustment.
Frosting no higher than 1.5 m from the floor may seem like a small difference compared to 1.7 m, but it can massively change how a room feels — more open, more liveable, and far more like a home.


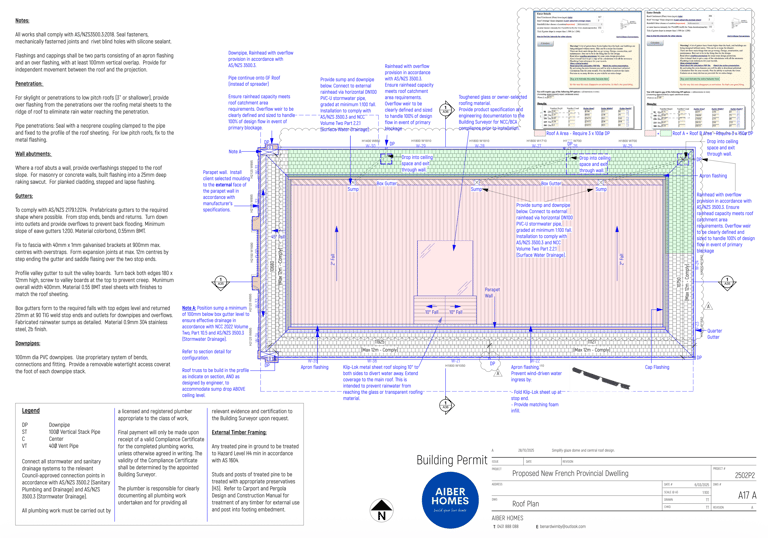
Most drawings don’t show roof drainage properly at all.
But doing the work up front — calculating runoff, checking Deem-to-Satisfy flow rates, placing sumps and downpipes correctly, and check the pipe routes before anyone steps on site — ensures the drains work properly and the home stays leak-free.
Here’s why it matters:
Internal downpipes are hidden, run through cupboards or wall cavities — not straight through the middle of your rumpus room ceiling.
Box gutters need to work with structural beams, not fight against them.
Waterproofing should rely on proper flashings, not just silicone that cracks after 5–7 years.
Overflow paths designed — not improvised on site under pressure.
That’s how we position our drawings: good design documents + a good plumber = no water leaks, fewer headaches, and a home that stays enjoyable — or a development that retains its profit — for years to come.

A good slab solves about 40% of all construction problems. (Some builders we’ve worked with say 50%. A few even swear it’s 60%.)
Slab mistakes are expensive because everything else sits on top of it. If you miss a toilet pipe, forget a recess, or place a drain even 200 mm off — suddenly you’re cutting concrete, arguing about compliance, and wondering whether your slab is still thick enough to meet the NCC after the rectification.
That’s why we prepare a dedicated slab plan.
- It lets the builder carry one clear drawing for the pour.
- It keeps all the critical information — falls, setouts, pipes, recesses — in one place.
- It makes checking simple and fast for everyone on site.
And yes — we will need to spend extra time double-checking everything.
But it’s far easier (and safer) to confirm pipe and everything on a computer than to stand on a muddy site trying to guess where the upstairs ensuite drain connects.
A clear slab plan reduces stress for your builder, prevents avoidable errors, and ultimately saves you time, money, and arguments.

Interior elevations show the builder exactly what your project requires — cupboards, drawers, benchtops, tiling (including extent and likely tile sizes), shower recesses, shelving layouts, and more.
So when the builders’ quotes come back — for example, one builder allows $20,000 for joinery and another allows $30,000 — you can ask, “What exactly have you allowed for here?”
This helps you choose the builder whose quality and price genuinely suit your needs, and ensures both of you begin the project with a clear understanding of what’s expected.
In domestic work, builders generally don’t have the time to read every line of a tender package because the expectation that a homeowner will take legal action is low. If a builder thoroughly analysed every document for every tender, they would spend huge amounts of unpaid time and their prices would become uncompetitive.
So instead of relying on the architect to select every interior product, it is far better to make those selections together with your preferred builder. This creates better alignment, sets clearer expectations, and results in far fewer surprises. And so our documentation is created to support that dynamic while minimising architectural costs.


Construction details finish the look of the design so everything ties together, looks good, and — just as importantly — prevents junctions from developing problems and leaks.
The high-risk, non-standard junctions — parapets, roof penetrations, cladding returns, eave junctions — should have a proper construction detail.
Construction details give the builder two clear paths. They can simply follow the detail we’ve drawn, knowing it’s designed to work and keep the junction waterproof. Or, if there’s a proprietary system from a manufacturer that’s easier and cheaper — and often there is, because manufacturers have solved the same problem for their product many times before — the builder can use that detail instead.
That’s why you’ll see we go quite extensive on these details — they draw attention to high-risk junctions and prompt the builder to deliver a tidy, leak-free solution when the work is carried out on site.